
Sunday, November 16, 2014
Like the article?
Well, one of my friend named OJANA MEGH told me to give some kind of basic Android Application Developing Guideline. So, I decided to write a post in simplest way for understanding for the guys who are new to Android Application Development. I'll offer full source code for you guys too. Here we go:-
Read More: Career in Mobile Application Development for You : My Experience
Tools you need for developing your first android Application:
1. ADT ( Download ADT from here )
2. JRE / JAVA Runtime Environment ( Download from here )
Updates you need to make:
Open up Eclipse from ADT that you downloaded and extracted. From top menu Click on Menu > Window > Android SDK manager
1. Follow this image: SDK Updates 1
2. Follow this image: SDK Updates 2
Install those whose are installed here. Restart Eclipse.
Work Flow:
1. Go in Eclipse. Press Alt+Shift+N , a window will appear. Click on Android Application Project for new Android Application Project.
2. Give a Application Name, as I named my app 'Simple App With Rubel'. For this project name your project exactly same as my one. Nothing Else needed. Click Next
3. Click Next Again. No need to do anything.
4. Here you will place icon for your application. Before starting create a icon and set that as your application icon. I placed the carnivalbd icon here. Click next.
5. Click Next here too, no need to do anything again.
6. Click on Finish! Your new project created successfully!
What to do next?
Well, I want a image of mine on my application and some description below. Then, My facebook and twitter link! Ok with you too? Well, after developing the app, it will look like below one:-
 |
| My Fitst App |
Follow the below steps:
1. Right click on res folder from your project and create a new folder called 'drawable'. In drawable folder, keep your image naming 'kitten'. Keep a facebook icon naming 'fb' and a twitter icon name 'tw'. Not clear? Follow the below screenshot.
 |
| Drawable Files Setup |
2. Now , place the below codes in your activity_main.xml file. Which is located in Project > res > layout folder.
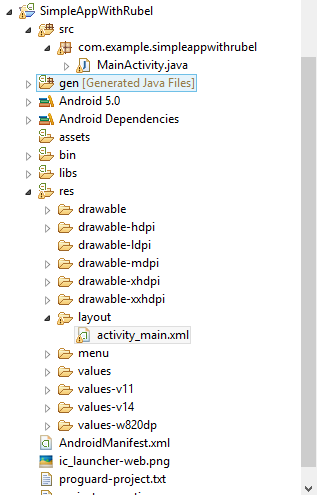 |
| Location of activity_main.xml file |
<RelativeLayout xmlns:android="http://schemas.android.com/apk/res/android"
xmlns:tools="http://schemas.android.com/tools"
android:layout_width="match_parent"
android:layout_height="match_parent"
android:paddingBottom="@dimen/activity_vertical_margin"
android:paddingLeft="@dimen/activity_horizontal_margin"
android:paddingRight="@dimen/activity_horizontal_margin"
android:paddingTop="@dimen/activity_vertical_margin"
tools:context="com.example.simpleappwithrubel.MainActivity"
android:background="#2b3c50" >
<LinearLayout
android:id="@+id/linearLayout1"
android:layout_width="wrap_content"
android:layout_height="wrap_content"
android:layout_centerHorizontal="true"
android:layout_marginTop="18dp"
android:gravity="center"
android:orientation="vertical" >
<ImageView
android:id="@+id/imageView1"
android:layout_width="200dp"
android:layout_height="200dp"
android:src="@drawable/kitten" />
<TextView
android:id="@+id/textView1"
android:layout_width="wrap_content"
android:layout_height="wrap_content"
android:text="My Name is Ojana Megh. And I'm developing my first application with Rubel. Visit the site of Rubel here in http://imRubel.blogspot.com"
android:textColor="#f9f9f9"
android:textSize="18dp" />
</LinearLayout>
<LinearLayout
android:layout_width="wrap_content"
android:layout_height="wrap_content"
android:layout_below="@+id/linearLayout1"
android:layout_centerHorizontal="true"
android:layout_marginTop="16dp" >
<ImageButton
android:id="@+id/imageButton1"
android:layout_width="80dp"
android:layout_height="80dp"
android:layout_marginRight="20dp"
android:onClick="fbc"
android:src="@drawable/fb" />
<ImageButton
android:id="@+id/imageButton2"
android:layout_width="80dp"
android:layout_height="80dp"
android:onClick="twc"
android:src="@drawable/tw" />
</LinearLayout>
</RelativeLayout>
3. Place the below codes in your Project > src > com.example.simpleappwithrubel > MainActivity.java file:
package com.example.simpleappwithrubel;
import android.app.Activity;
import android.content.Intent;
import android.net.Uri;
import android.os.Bundle;
import android.view.View;
import android.widget.ImageButton;
public class MainActivity extends Activity {
public ImageButton fb,tw;
@Override
public void onCreate(Bundle savedInstanceState) {
super.onCreate(savedInstanceState);
setContentView(R.layout.activity_main);
fb = (ImageButton) findViewById (R.id.imageButton1);
tw = (ImageButton) findViewById (R.id.imageButton2);
}
public void fbc(View v) {
Uri uri = Uri.parse("https://facebook.com/rubel007cse");
Intent intent = new Intent(Intent.ACTION_VIEW, uri);
startActivity(intent);
}
public void twc(View v) {
Uri uri = Uri.parse("https://twitter.com/rubel007cse");
Intent intent = new Intent(Intent.ACTION_VIEW, uri);
startActivity(intent);
}
}
Read More: Google Adsense – Guideline to Success from my Experience
4. Click on Window from Menu. Then click on Android Virtual device. Click on Device Definition tab. Then, click on Create AVD from the right side. Then, Select and place options as shown in below. Then, click OK OK and come out. ( follow below images )
 |
| Select this from device definition |
 |
| Select yours like this and click ok |
5. Right click on your project. Find 'Run As' > 'Android Application'. Then your project will be built up with apk file. Find the apk folder on workspace > your project > bin folder. You can take this apk file to your Android Phone and run this application.
We are done! Happy developing! Happy coding!
Comment if you face any problem!
Subscribe for More!
Share for others!
Read More: 9 Ideas for Career ( Online Money Making ) based on your Love
Subscribe to:
Post Comments (Atom)
Me on FB
Popular Articles
-
 Hello mobile apps developers! if you are developing Mobile application in Phonegap platform. You might face a problem in sometime ' C...
 -
Hello Google Play Android Developers! Recently, Google is forcing its developers to use Android Studio rather than using Android Developmen...
-
 Hello developers! Hope you are doing well. Many people are coming to application developing, specially in the Android arena. Now, What! Th...
 -
 Polymorphism We are going to create four Java class in our Polymorphism class. Those are: 1. human.java class 2. women.java class...
 -
 Even if you are not from Computer Engineering background, still you can have Career in Mobile Application Development. Honestly speaking, b...
 -
 People related to programming and coding often make mistakes or misuse the words Coders and Programmers by not knowing properly. So, questi...
 -
 Today we are going to learn Inheritance in JAVA. I've created four java class file. Those are: 1. fatherswealth.java ( Superclass ) ...

Popular Posts
-
Hello mobile apps developers! if you are developing Mobile application in Phonegap platform. You might face a problem in sometime ' C...
-
Even if you are not from Computer Engineering background, still you can have Career in Mobile Application Development. Honestly speaking, b...
-
Hello Google Play Android Developers! Recently, Google is forcing its developers to use Android Studio rather than using Android Developmen...
-
Polymorphism We are going to create four Java class in our Polymorphism class. Those are: 1. human.java class 2. women.java class...
-
Polymorphism We are going to create four Java class in our Polymorphism class. Those are: 1. human.java class 2. women.java class...
-
 You could find this topic little bit interesting and may not be hoping from me! Well, I was at gym for almost one year and I think I'm ...
 -
 Array: An array is something more or less like a container of data. Array container contains same type of data. Read More from Orac...
 -
 Today, we are going to learn about Thread in JAVA. simpleThread.java Class public class simpleThread implements Runnable { /* ...
 -
 Google Adsense , success for a lot of people and failure for a bunch of people too! Making money with Google Adsene is not easy but n...
 -
 Hi to All! Today we are going to learn another JAVA OOP concept which is Encapsulation. Let's Start: Encapsulation in JAVA Let...


I'm mainly Having problem with Just Installing SDK online and it's happening because of my Internet :( That's of why i can't do anythings about android ! :( If i can get a offline version ! will be really much better for me !
ReplyDeleteTell somebody to download and update it for you, then bring it in your pc through pen drive! It'll work fine as it's portable software.
Delete