
Wednesday, October 22, 2014
Like the article?
Hello Mobile Application developers! Ya, Google has moved to a change and we developers will have to cope up with that change. To set up Admob in new updated SDK , we need to do some tasks. Few of them are tricky, so be with me and follow my instruction. I faced some problems and that ruined my few days to fix it. If you follow this , I hope you won't have to face the same way.
Previously, we used to use GoogleAdMobAdsSdk-6.4.1.jar in our application for monetization. But now we have to go up. Now, we don't need any .jar file but update our SDK. I would suggest to download a new one.

So, Let's start:
Task 1: Download the fresh and new Android SDK from Here. Make sure, you are using a computer with 64 bit, otherwise it won't show up the Android Virtual Device ( AVD ).
Now you need to make some updates.
Task 2: Open up eclipse from the Android SDK and go to Window > Android SDK Manager. Or, click on the icon shown in below image.
A new window will show up SDK. Here we will make some updates. Look at the below images, and check
those ( Which are installed in below images ) on your Android SDK Manager and click on Install x packages after
accepting license agreement.
After installation, restart Eclipse. Now, we are done with installation.
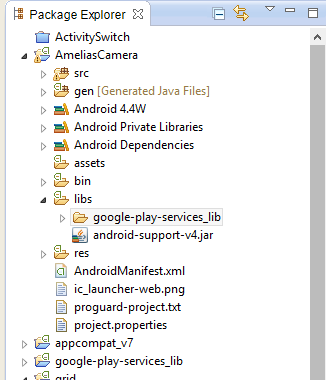
Task 3: Now, go to your ADT bundle package on your PC and we need to copy a folder from there. Go to, ADT Bundle > SDK > Extras > Google > google_pay_services_libproject . Look at the file path at the below image. Copy the folder name google-play-services_lib.
Task 4: Done with copying? Now , we need to paste this folder on the project you are doing or the Application you are developing. Go to Eclipse and in project explorer paste this folder in to your project > libs. Now clear? Follow the below image.
Done with pasting? I guess thats easy! :3
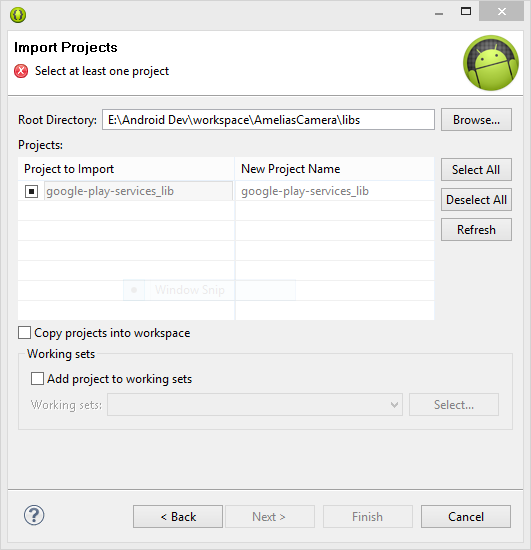
Task 5: Now, we need to import that file. Look on the top left corner on your eclipse, click on File > Import > Android > Existing Android Code into Workspace . You need to import your full libs folder. Through this window, go to Workspace > Your Project > Libs . Select that and the click OK. Not clear yet? See, below screen shots.

Task 6: This very simple. Just check the imported file and click on finish. we are almost done! Below image will help you more,
Now, if the Imported file show an error and ask for number of SDK in L ( Android Lollipop ) preview, go there and make it L in the place of 8. Like below image:-
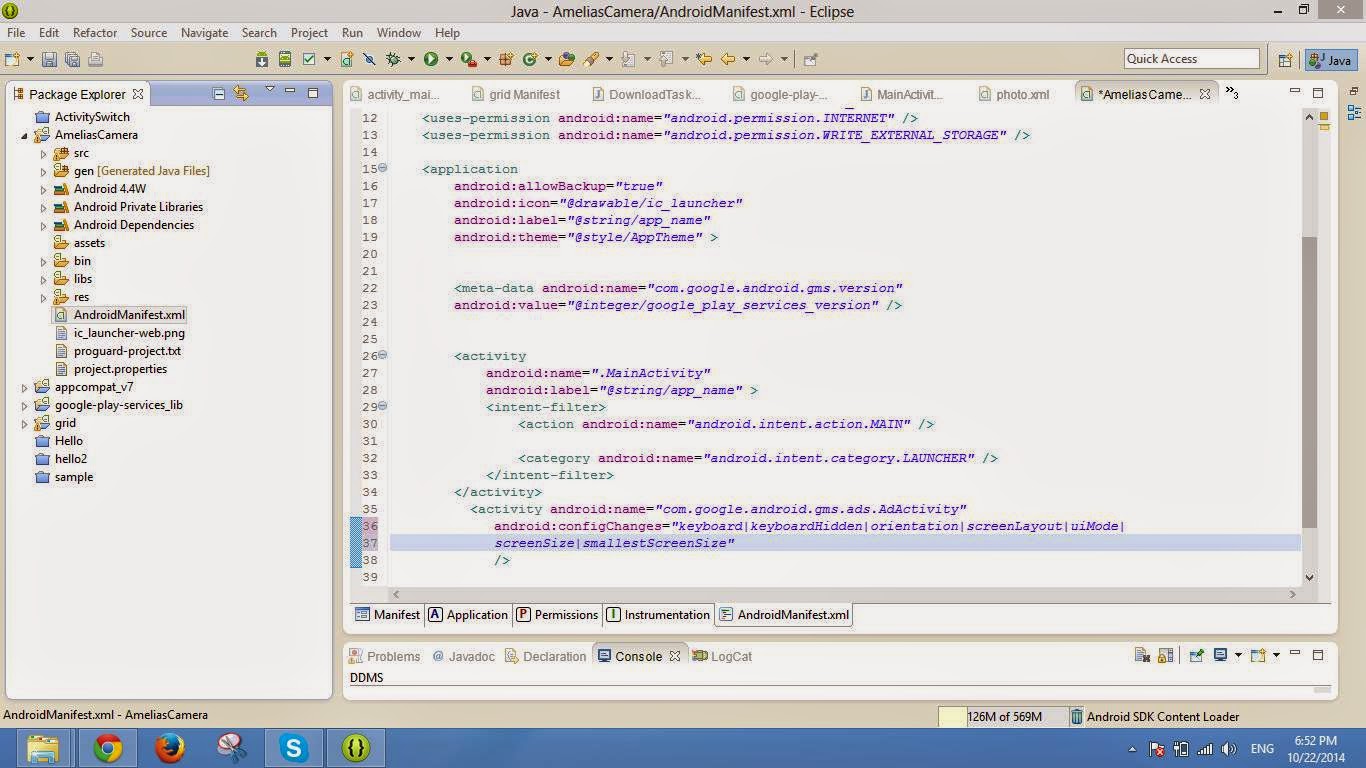
Task 7: Now, go to your AndroidManifest.xml file, We need to add some permission for showing admob Ads. Add bellow codes after <application />
Task 8: Now, we will place the add codes in our main xml file. Open up , res/layout/activity_main.xml. See below image. Place <com.google.android.gms.ads.AdView> xml tag as show below and replace, adUnitId with your adUnitId , generated from admob.com
Task 9: You XML might be showing some errors till now. Add xmlns:ads = "http..." line on the <ScrllView> or <RelativeLayout> tag. The errors will be gone!
Task 10: Go to the MainActivity.java file. And couple of imports at the top :
Now, add couple more lines into onCreate method:
Well, I guess we are done! :D
There the ads should be shown up! Like the below image: -
Task 11: If yet not shown, you can go right click on Your Project > Android and select things like below image:

I hope no more error left! If you find more errors, go die! Just kidding, you can leave a comment below, I'll try to solve!
If the post helps you, comment, share for others, subscribe for you and buy me a MacBook Air :P
Previously, we used to use GoogleAdMobAdsSdk-6.4.1.jar in our application for monetization. But now we have to go up. Now, we don't need any .jar file but update our SDK. I would suggest to download a new one.
So, Let's start:
Task 1: Download the fresh and new Android SDK from Here. Make sure, you are using a computer with 64 bit, otherwise it won't show up the Android Virtual Device ( AVD ).
Now you need to make some updates.
Task 2: Open up eclipse from the Android SDK and go to Window > Android SDK Manager. Or, click on the icon shown in below image.
 |
| Android SDK Manager |
 |
| You need to install those Installed Packages |
 |
| You need to install those Installed Packages |
After installation, restart Eclipse. Now, we are done with installation.
Task 3: Now, go to your ADT bundle package on your PC and we need to copy a folder from there. Go to, ADT Bundle > SDK > Extras > Google > google_pay_services_libproject . Look at the file path at the below image. Copy the folder name google-play-services_lib.
 |
| See the file path and Copy this folder |
Task 4: Done with copying? Now , we need to paste this folder on the project you are doing or the Application you are developing. Go to Eclipse and in project explorer paste this folder in to your project > libs. Now clear? Follow the below image.
 |
| Paste the folder into libs |
Done with pasting? I guess thats easy! :3
Task 5: Now, we need to import that file. Look on the top left corner on your eclipse, click on File > Import > Android > Existing Android Code into Workspace . You need to import your full libs folder. Through this window, go to Workspace > Your Project > Libs . Select that and the click OK. Not clear yet? See, below screen shots.
 |
| After clicking on libs, click OK |
Task 6: This very simple. Just check the imported file and click on finish. we are almost done! Below image will help you more,
 |
| See the Root Directory Path |
Now, if the Imported file show an error and ask for number of SDK in L ( Android Lollipop ) preview, go there and make it L in the place of 8. Like below image:-
 |
| Buddy, Make it L , replace 8 |
Task 7: Now, go to your AndroidManifest.xml file, We need to add some permission for showing admob Ads. Add bellow codes after <application />
Then, add another activity code, just after the first activity. Not clear? just copy below codes as the image suggests place:
<meta-data android:name="com.google.android.gms.version"
        android:value="@integer/google_play_services_version" />
<activity android:name="com.google.android.gms.ads.AdActivity"
android:configChanges="keyboard|keyboardHidden|orientation|screenLayout|uiMode|
screenSize|smallestScreenSize"
/>
Task 8: Now, we will place the add codes in our main xml file. Open up , res/layout/activity_main.xml. See below image. Place <com.google.android.gms.ads.AdView> xml tag as show below and replace, adUnitId with your adUnitId , generated from admob.com
 |
| go to admob.com and generate an add, get adUnitId |
Task 9: You XML might be showing some errors till now. Add xmlns:ads = "http..." line on the <ScrllView> or <RelativeLayout> tag. The errors will be gone!
 |
| Add xmlns:adds line |
Task 10: Go to the MainActivity.java file. And couple of imports at the top :
import com.google.android.gms.ads.AdRequest;
import com.google.android.gms.ads.AdView;
Now, add couple more lines into onCreate method:
AdView adView = (AdView)this.findViewById(R.id.adView);
AdRequest adRequest = new AdRequest.Builder().build();
adView.loadAd(adRequest);
Well, I guess we are done! :D
There the ads should be shown up! Like the below image: -
 |
| Ads are appearing! |
Task 11: If yet not shown, you can go right click on Your Project > Android and select things like below image:
I hope no more error left! If you find more errors, go die! Just kidding, you can leave a comment below, I'll try to solve!
If the post helps you, comment, share for others, subscribe for you and buy me a MacBook Air :P
Read More: Career in Mobile Application Development for You : My Experience
Subscribe to:
Post Comments (Atom)
Me on FB

Popular Articles
-
 Hello mobile apps developers! if you are developing Mobile application in Phonegap platform. You might face a problem in sometime ' C...
 -
Hello Google Play Android Developers! Recently, Google is forcing its developers to use Android Studio rather than using Android Developmen...
-
 Polymorphism We are going to create four Java class in our Polymorphism class. Those are: 1. human.java class 2. women.java class...
 -
 Even if you are not from Computer Engineering background, still you can have Career in Mobile Application Development. Honestly speaking, b...
 -
 Hello developers! Hope you are doing well. Many people are coming to application developing, specially in the Android arena. Now, What! Th...
 -
 You could find this topic little bit interesting and may not be hoping from me! Well, I was at gym for almost one year and I think I'm ...
 -
 Today, we are going to learn about Thread in JAVA. simpleThread.java Class public class simpleThread implements Runnable { /* ...

Popular Posts
-
Hello Google Play Android Developers! Recently, Google is forcing its developers to use Android Studio rather than using Android Developmen...
-
You could find this topic little bit interesting and may not be hoping from me! Well, I was at gym for almost one year and I think I'm ...
-
Even if you are not from Computer Engineering background, still you can have Career in Mobile Application Development. Honestly speaking, b...
-
Polymorphism We are going to create four Java class in our Polymorphism class. Those are: 1. human.java class 2. women.java class...
-
Today, we are going to learn about Thread in JAVA. simpleThread.java Class public class simpleThread implements Runnable { /* ...
-
 Array: An array is something more or less like a container of data. Array container contains same type of data. Read More from Orac...
 -
Hello mobile apps developers! if you are developing Mobile application in Phonegap platform. You might face a problem in sometime ' C...
-
Polymorphism We are going to create four Java class in our Polymorphism class. Those are: 1. human.java class 2. women.java class...
-
 Hi to All! Today we are going to learn another JAVA OOP concept which is Encapsulation. Let's Start: Encapsulation in JAVA Let...
 -
 Today we are going to learn Inheritance in JAVA. I've created four java class file. Those are: 1. fatherswealth.java ( Superclass ) ...


Here is my problem http://i.imgur.com/8Whzm1E.jpg How can I solve this? please help me.
ReplyDeleteafter importing google-play-servives_lib file, this error will disappear. Please follow full instruction.
DeleteThanks
DeleteT5RX Overcoming shyness starts offevolved with toddler steps. Introduce your self to society by beginning yourself to people step by step. you could strike up conversations along with your officemates. in case you want anonymity talk to humans in airports bus terminals restaurants or anywhere you could find someone who appears open to speakme. http://www.strongtesterone.com/t5rx/
ReplyDeleteUseful tutorial, appreciate it. Not sure if you know, but there is another SDK called GlobalHop, which can be implemented into your app together with admob. They can work together because globalhop monetize your app without any ads, so these two apps will increase your income
ReplyDeleteDid you know that you can make money from your app without any ads? PacketSDK can help you do that. How it works is very simple: when a device embeds the SDK app, requests are routed through the user's device to various websites to extract public data. Without slowing down the user's device or draining the battery.
ReplyDeletehttps://www.packetsdk.com/?utm-source=vM6X4WP4